

Riprendo il tema Certified Cicerone® che ho introdotto qualche settimana fa con un post in cui ne evidenziavo le differenze principali rispetto al Beer Judge Certification Program (BJCP).
Oggi vorrei focalizzarmi sulla parte del Tasting and Demo Exam, ovvero l’esame pratico, che dovrò sostenere il prossimo 5 luglio a Milano, presso il laboratorio di Personal Brewery. Dell’esame scritto, che ho sostenuto e superato a fine agosto 2025, parlerò in un post successivo.
Riassumendo: gli esami per diventare Certified Cicerone® sono due: il Written Exam, che si sostiene online, e il Tasting and Demo Exam, che bisogna sostenere in persona. A differenza del BJCP, che richiede il superamento del Tasting Exam con almeno un voto di 80/100 per sostenere il Written Exam, il Cicerone permette di provare i due esami nell’ordine che si preferisce.
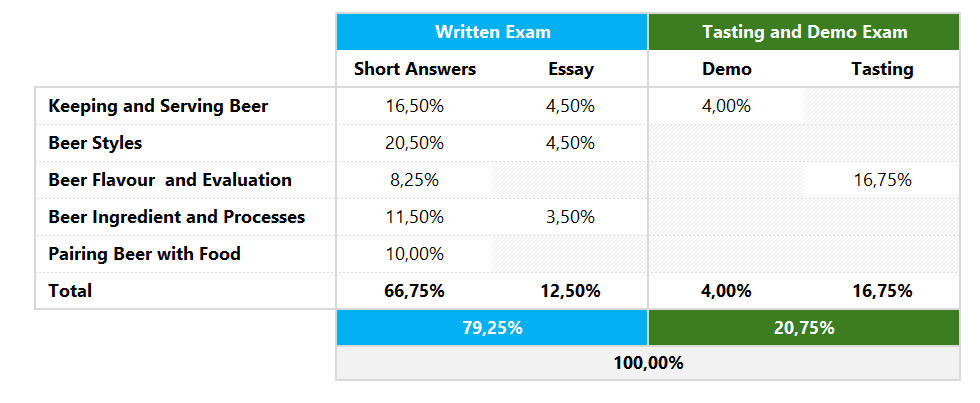
Lo schema di valutazione degli esami per il Certified Cicerone® è articolato secondo la tabella seguente, che ho ripreso dalla guida all’esame pubblicata sul sito del Cicerone.
Gli unici due vincoli che ho trovato espressamente citati sul sito del Cicerone sono:
- per diventare Certified Cicerone® serve un voto complessivo di almeno 80%
- per passare il Tasting and Demo Exam serve un voto pari ad almeno 70% nella parte Tasting (da come è formulato il regolamento, questa soglia sembra riferirsi esclusivamente alla componente Tasting e non alla Demo).
I pesi espressi nella tabellina sopra rendono di fatto molto difficile diventare Certified Cicerone® senza un voto alto al Written. Considerando che il Written pesa il 79,25% del punteggio complessivo, il risultato finale dipende in larga misura dalla performance nella prova scritta.
Nello scenario peggiore, quello in cui si supera il Tasting & Demo con il minimo indispensabile (70% al Tasting, 0% alla Demo), per arrivare comunque all’80% complessivo serve un voto al Written pari ad almeno 86%.
Nello scenario opposto, quello in cui Tasting e Demo vengono passati entrambi a punteggio pieno (100%, caso poco realistico), il voto del Written potrebbe scendere fino al 75% per arrivare comunque all’80% complessivo.
Partiamo dal capire nel dettaglio come funziona l’esame Tasting & Demo, che dovrò sostenere il 5 luglio a Milano.
L’esame Tasting
Il Tasting & Demo si divide in due macro aree: la parte degli assaggi alla cieca (Tasting), che dura 45 minuti e che richiede un voto pari almeno al 70% per passare, e la dimostrazione pratica (la Demo), che dura 3 minuti e non ha soglia.
Come evidente da questo sample d’esame pubblicato dal Cicerone, il Tasting si articola in tre parti.
Identificazione degli Off-flavor
Il candidato riceve cinque campioni di birra: uno viene espressamente etichettato come controllo (ovvero il campione di birra senza difetti), gli altri quattro sono campioni incogniti (A, B, C, D). Tre di questi contengono un difetto da riconoscere, l’altro è pulito (ovvero identico al controllo).
Dal testo di esempio dell’esame pubblicato dal Cicerone, la lista degli off-flavour tra cui scegliere si compone di:
- acetaldeide
- acido acetico
- diacetile
- DMS (dimetilsolfuro)
- lightstruck o colpo di luce (3MBT)
- trans-2-nonenale (T2N).
Per quanto riguarda invece i difetti che possono effettivamente comparire nei campioni d’esame, non esiste un elenco ufficiale pubblicato dal Cicerone. Il Syllabus richiede la capacità generica di identificare i difetti comuni che si possono presentare nella birra, senza nominarli specificatamente.
Il corso di preparazione al Cicerone di Rich Higgins (Master Cicerone), cita effettivamente sei difetti nella sezione In-Person Prep Course for the Certified Cicerone® Exam, senza però indicare quali siano. Il fatto che si tratti proprio di sei difetti mi spinge a pensare che la rosa sia effettivamente quella del sample di esame, ma non ne sono sicuro al 100%.
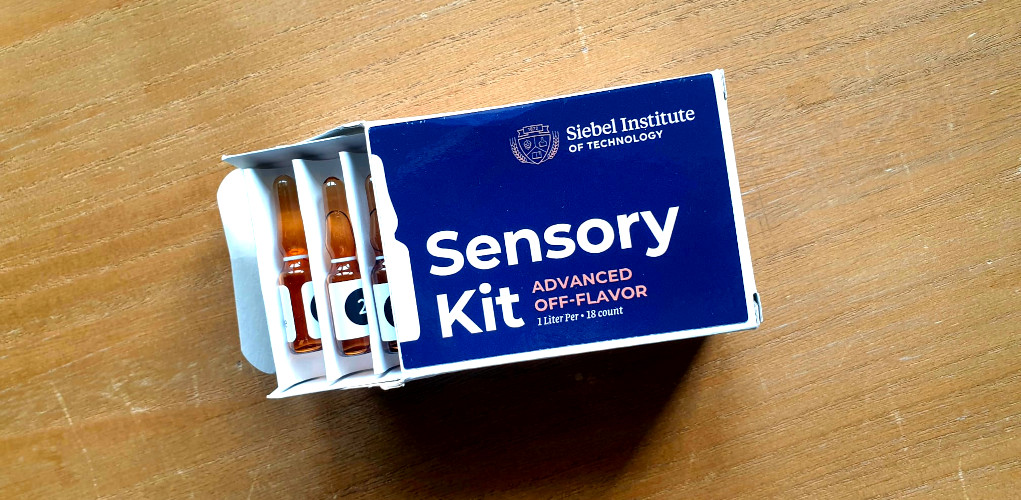
Per questa parte dell’esame, il mio consiglio è di allenarsi con i kit della Siebel (ne ho parlato qui).
Riconoscimento degli stili
Vengono consegnati altri quattro campioni (E, F, G, H). Per ciascuno viene proposta una scelta tra due stili possibili: bisogna indicare quale dei due corrisponde alla birra assaggiata.
Le coppie di stili proposte nel sample di esame non mi sembrano enormemente difficili da identificare, ma alcune sono insidiose. La differenza tra Dubbel e British Brown Ale dovrebbe essere abbastanza evidente, quella tra Doppelbock e Wee Heavy potrebbe essere più sottile.
Per questa parte del tasting serve una buona conoscenza degli stili e una buona esperienza di assaggio.
Quality assessment
L’ultima parte, quella che richiede risposte un filo più articolate (sebbene lo spazio per scrivere sia limitato), prevede che vengano serviti ulteriori quattro campioni (I, J, K, L) di cui viene dichiarato lo stile.
Al candidato viene richiesto di stabilire se la birra sia idonea alla vendita o se presenta difetti dovuti a gestione impropria di fusto o bottiglie. Se ritiene che presenti un problema qualitativo, deve indicarne la natura e la causa più probabile.
Trattandosi di difetti che possono insorgere per cattiva gestione di fusti e bottiglie, mi viene da pensare che la rosa sia limitata a colpo di luce, infezione (acidità e/o diacetile), ossidazione. Dato che sia acetaldeide che T2N possono formarsi per ossidazione, direi che potrebbero ragionevolmente essere entrambi nella rosa dei difetti potenzialmente presenti per questa parte dell’esame.
L’esame Demo
Finito il Tasting, si passa alla dimostrazione pratica. Tre minuti, videoregistrati, su un tema legato al Keeping & Serving.
Non è pubblicamente noto quale sia la prova richiesta. In genere viene fornita una componente dell’impianto di servizio della birra e si deve dimostrare una procedura di manutenzione o pulizia davanti alla telecamera.
Secondo molti (tra cui Beer Scholar, un Cicerone che prepara i candidati all’esame da molti anni), dal primo esame Certified Cicerone del 2008 la richiesta è sempre stata la stessa: smontare e pulire un rubinetto per la spillatura.
Non è un dato confermato dal Cicerone, che chiede esplicitamente ai candidati di non divulgare i contenuti dell’esame. In teoria, nulla esclude che un giorno la richiesta cambi: tra le alternative più plausibili, sempre secondo Beer Scholar, ci sarebbe la pulizia di un coupler (l’attacco tra fusto e impianto spillatura) o di un FOB (il Foam On Beer, ovvero il dispositivo che blocca il flusso di birra quando il fusto è vuoto).
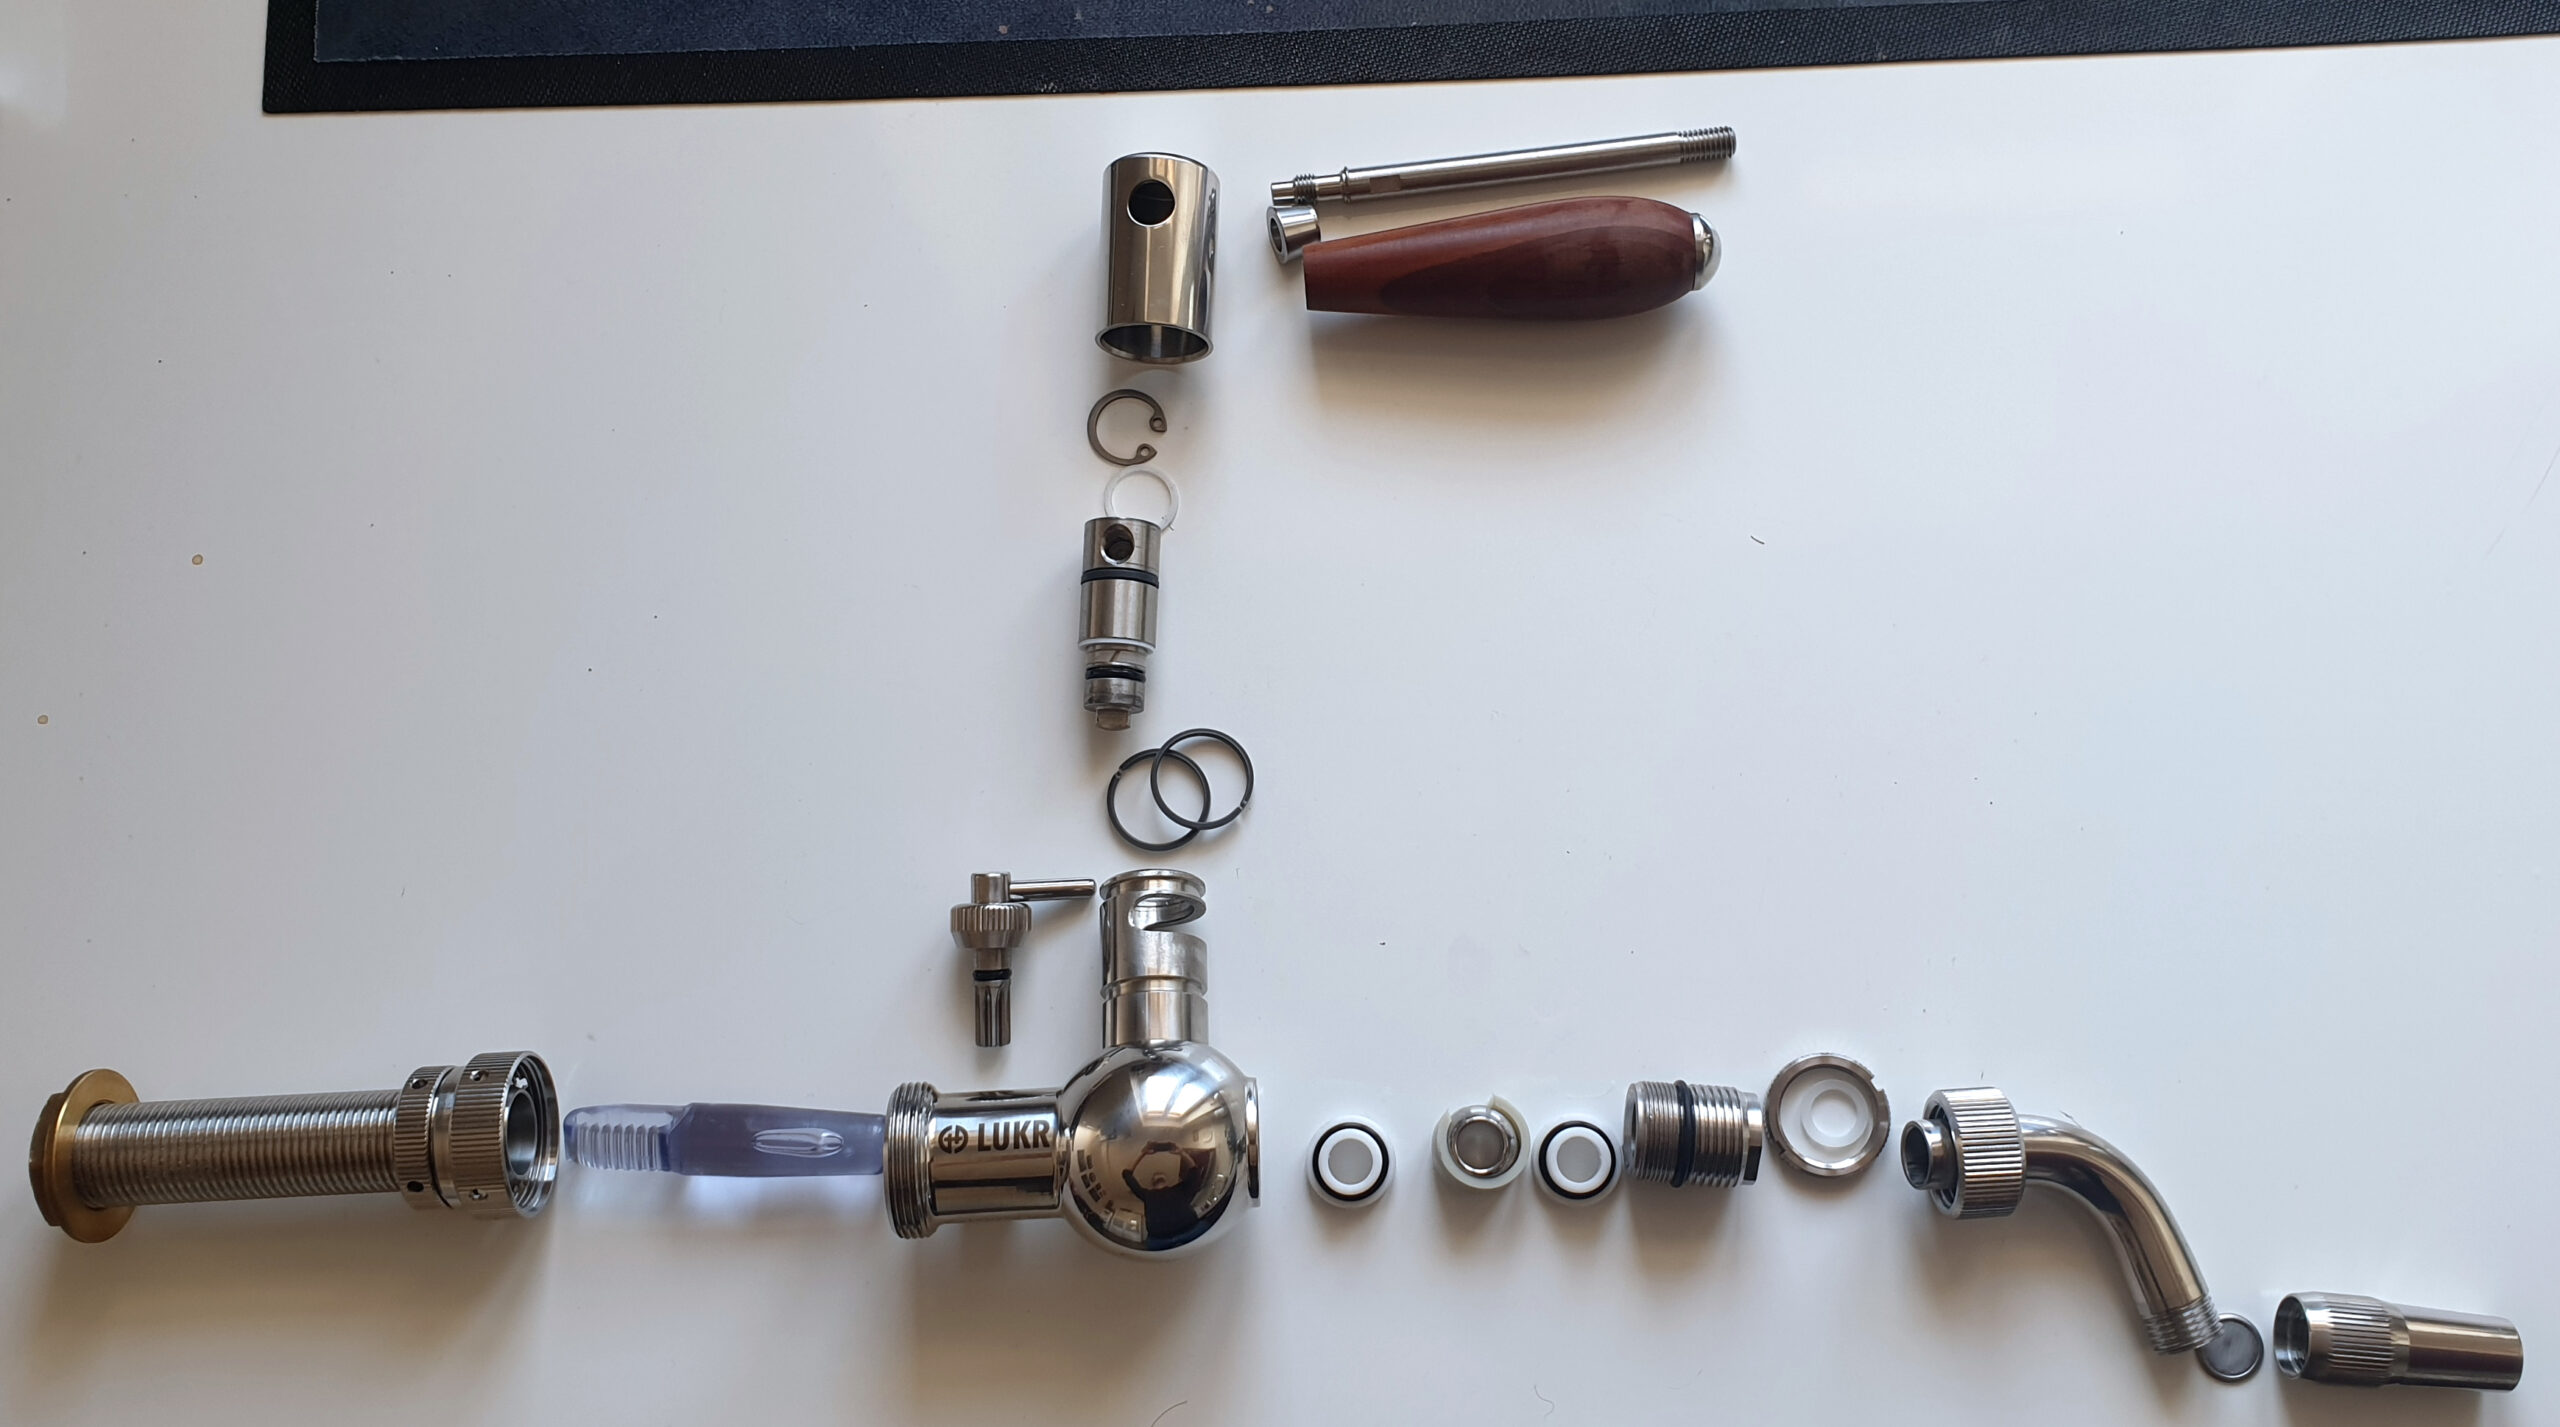
Ha senso prepararsi per tutti e tre. Magari facendo pratica sul solo rubinetto (che si può comprare facilmente per qualche decina di euro, se non lo si ha già), imparando dai video per gli altri due, la cui probabilità di venire proposti è molto bassa.
Sul web sono disponibili diversi video che spiegano come smontare i tre componenti, nel seguito i link:
Questo è quanto. Vado a studiare per l’esame.
A breve pubblicherò un post dedicato al Written Exam, che invece ho già sostenuto nell’agosto 2025.

Certified Cicerone®: the Tasting and Demo Exam
I’m picking up the Certified Cicerone® topic I introduced a few weeks ago, when I outlined the main differences with the Beer Judge Certification Program (BJCP).
Today I want to focus on the Tasting and Demo Exam, the hands-on portion I’ll be taking on July 5th in Milan, at the Personal Brewery lab. I’ll cover the Written Exam, which I took and passed in late August 2025, in a future post.
To recap: there are two exams to become a Certified Cicerone®: the Written Exam, taken online, and the Tasting and Demo Exam, which must be taken in person. Unlike the BJCP, which requires passing the Tasting Exam with a score of at least 80/100 before sitting the Written Exam, Cicerone lets you take the two exams in whichever order you prefer.
The grading scheme for the Certified Cicerone® exam is structured according to the table below, which I pulled from the exam guide published on the Cicerone’s website.
The only two constraints explicitly stated on Cicerone’s site are:
- to become a Certified Cicerone® you need an overall score of at least 80%
- to pass the Tasting and Demo Exam you need a score of at least 70% on the Tasting portion (this threshold seems to apply only to the Tasting component, not the Demo)
The weights shown in the table above make it very difficult to become a Certified Cicerone® without a high score on the Written part. Considering the Written accounts for 79.25% of the overall score, the final result depends largely on performance on the Written test.
In the worst-case scenario, where you pass the Tasting & Demo with the bare minimum (70% on Tasting, 0% on Demo), you’d still need a Written score of at least 86% to reach the 80% overall threshold.
In the opposite scenario, where both Tasting and Demo are passed with a perfect score (100%, a rather unrealistic case), the Written score could drop as low as 75% and still reach the overall 80%.
Let’s start by understanding in detail how the Tasting & Demo exam works, the one I’ll be taking on July 5th in Milan.
The Tasting Exam
The Tasting & Demo is split into two main parts: the blind tasting portion (Tasting), which lasts 45 minutes and requires a score of at least 70% to pass, and the practical demonstration (the Demo), which lasts 3 minutes and has no threshold.
As shown in this sample exam published by Cicerone, the Tasting is organized into three parts.
Off-flavor identification
The candidate receives five beer samples: one is explicitly labeled as the control (i.e., the beer sample with no defects), the other four are unknown samples (A, B, C, D). Three of these contain an off-flavour to identify, the other is clean (i.e., identical to the control).
From the sample exam sheet provided by Cicerone, the list of off-flavors to choose from consists of:
- acetaldehyde
- acetic acid
- diacetyl
- DMS (dimethyl sulfide)
- lightstruck (3MBT)
- trans-2-nonenal (T2N)
As for the off-flavours that can actually appear in the exam samples, there’s no official published list from Cicerone. The Syllabus requires the generic ability to identify common defects that can occur in beer, without naming them specifically.
Rich Higgins’s (Master Cicerone) prep course for the Certified Cicerone® Exam does mention six off-flavours in the In-Person Prep Course section, without specifying which ones. The fact that it’s exactly six off-flavours makes me think the list is indeed the one from the sample exam, but I’m not 100% sure.
For this part of the exam, my advice is to train with Siebel’s kits (I wrote about it here).
Style recognition
Four more samples (E, F, G, H) are given out. For each one, a choice between two possible styles is proposed: you have to indicate which of the two matches the beer you tasted.
The style pairs proposed in the sample exam don’t seem particularly hard to identify, but some are tricky. The difference between a Dubbel and a British Brown Ale should be fairly evident, while the one between a Doppelbock and Wee Heavy could be more subtle.
For this part of the tasting you need good knowledge of styles and good tasting experience.
Quality assessment
The last part, which requires slightly more elaborate answers (although the space to write is limited), involves four more samples (I, J, K, L) for which the style is declared.
The candidate must determine whether the beer is sellable or whether it presents defects due to improper handling of the keg or bottles between the brewery and the point of sale. If they believe there’s a quality issue, they need to indicate its nature and the most likely cause.
Since these are off-flavours that can originate from poor handling of kegs and bottles, I’d guess the pool is limited to lightstruck, infection (acidity and/or diacetyl), and oxidation. Since both acetaldehyde and T2N can form through oxidation, I’d say both could reasonably be in the pool of potential defects for this part of the exam.
The Demo Exam
After the Tasting, you move to the practical demonstration. Three minutes, video-recorded, on a topic related to Keeping & Serving beer.
It’s not publicly known exactly what task is required. Generally, you’re given a component of the beer service system and have to demonstrate a maintenance or cleaning procedure on camera.
According to many (including Beer Scholar, a Cicerone who has been training candidates for the exam for many years), since the first Certified Cicerone exam in 2008, the request has always been the same: how to disassemble and clean a draft faucet.
This isn’t confirmed by the Cicerone, who explicitly asks candidates not to disclose exam content. In theory, nothing rules out the request changing one day: among the most plausible alternatives, again according to Beer Scholar, would be cleaning a coupler or a FOB (Foam On Beer, the device that stops the flow of beer when the keg runs empty).
It makes sense to prepare for all three. Maybe practicing on the faucet alone (which is easy to buy for a few dozen euros, if you don’t already have one), and learning from videos for the other two, which are far less likely to come up.
There are several videos online showing how to disassemble all three components, links below:
That’s it for now. Off to study for the exam.
I’ll soon publish a post dedicated to the Written Exam, which I already took and passed in August 2025.
